
When you initially activate ScanWriter Excel Standard Ed., enter your login email (which may be an admin email), and the password (CD Key). The AI component, called ScanWriterAI, can build custom workflows to process files, integrate data, and perform data enrichment tasks like normalizing names. It can also provide deeper insights by parsing location and purpose of transactions and categorizing data. You must be logged in to post a comment. The AI Data Retrieval feature in ScanWriter automatically normalizes business names, offers supplementary information about the data being processed, and generates additional columns such as location and purpose, enhancing the overall data organization and analysis process. You must be logged in to post a comment. ScanWriter AI uses natural language processing and machine learning to read and analyze the data from the documents. It can normalize names, categorize transactions, identify transaction types and purposes, and provide location information. The AI can also summarize the data and provide recommendations for further investigation. You must be logged in to post a comment. Yes, ScanWriter AI can handle large volumes of data, but the number of pages you can read at once will depend on your computer’s availalble resources. It’s recommended to start with smaller files and gradually increase the size to test your computer’s capabilities. You must be logged in to post a comment. ScanWriter AI supports 26+ languages, including English, Spanish, French, German, Italian, Dutch, Portuguese, Russian, Chinese, Japanese, and Korean…etc. However, the accuracy of the translation may depend on the complexity and nuances of the statement. If you need a specific language captured or have any concerns about the accuracy of the translation, please contact help@personable.com or call +1(714)-430-6944. You must be logged in to post a comment. ScanWriter AI is an AI-powered tool designed to efficiently process both structured and unstructured financial files, such as bank statements, deposit slips, and check images. It automates data capture, analysis, and integration, helps uncover hidden patterns, detect potential fraud, and provide insights into the “who, what, when, and where” of financial transactions, saving significant time and resources. You must be logged in to post a comment. Although the classic accuracy verification features – Totals, Check Balance, and Compare Data – are still available in the ScanWriter AI, users can streamline their workflow by adding Check Balance to their autopilot configuration. When the autopilot is executed, ScanWriter AI will automatically apply the Check Balance to the capture data. Check Balance compares the balance calculated by ScanWriter against the balance on the statement. If the balance difference shows a blue 0.00, it indicates that the data is correct. For more details, users can refer to the “How to use Check Balance” and “How to setup the AutoPilots Configuration” guide on the ScanWriter website. You must be logged in to post a comment. Yes, the AI Edition allows you to automate the processing of documents. ScanWriter AI can automatically identify the type of documents and select the appropriate reader for them, with Autopilot, you can set default or customized actions for various document types. Additionally, ScanWriter AI has the capability to provide summaries and visualizations from the documents. You must be logged in to post a comment. Yes, ScanWriter AI can cross-reference and analyze data from different accounts and documents. ScanWriter AI can find the connections between accounts and generate visualizations and reports. It can analyze text, identify relevant information, and compare data points across various sources. Here are a few ways it can assist: Integration: AI can combine data from different statements, supporting files, and other data sets into a single view, making it easier to analyze overall financial health. Data Capture: ScanWriter AI can extract transaction details from multiple statements and files, such as dates, amounts, descriptions, account numbers, and other critical information. Identifying Duplicates: It can compare transactions across statements to identify duplicates or discrepancies. Categorization: AI can categorize transactions (e.g., income, expenses) and help in generating summaries or reports. Anomaly Detection: It can highlight unusual transactions or patterns that may require further investigation. You must be logged in to post a comment. ScanWriter AI provides various types of data visualization and analysis, including various chart types (bar, line, pie, scatter plots), descriptive statistics, and natural language processing for text analysis…etc. These capabilities allow users to effectively compare values, show trends, summarize data with statistics, and analyze text data. You must be logged in to post a comment. ScanWriter AI leverages all the features of ScanWriter Standard and includes advanced data capture and machine learning technologies to predict and flag suspicious behaviors. In addition to the Natural Language Processing chat window, ScanWriter AI provides a robust financial fraud investigation system that can improve the speed of fraud case data collection and analysis, enhance the efficiency of financial investigators, reduce the time and resources required for fraud investigations, predict and flag potential fraudulent activities in real-time, and provide a significant return on investment. You must be logged in to post a comment. To upgrade to ScanWriter AI Edition, please Contact ScanWriter sales by emailing sales@Personable.com or calling +1(714)-430-6944 to inquire about upgrading your current version of ScanWriter to the AI Edition. Please note that upgrading to ScanWriter AI Edition may require an additional fee and may be subject to the terms and conditions of your current license agreement. You must be logged in to post a comment. You can simply rename the project folder in Windows, then add the new project in ScanWriter. You must be logged in to post a comment. After selecting the project folder, there will be three subfolders: Findings, Project Overview, and Source Documents. Usually, only one project folder should be created for each case, and we recommend you use the structure to organize your documents. For example, if you are exporting data from Chase into Power BI, and the model selected was “All Transactions”, then first click Export PBI Data or Export and Run PBI. Choose the Excel Source Folder for the Power BI Report: Findings-> Analysis-> Power BI Models -> All Transactions-> Chase (Bank Name). For example, the statement for Chase (3 months) can be put into the following folder. If you choose to not use the structure ScanWriter created, please pay attention to the place SW Entities is saved and make sure PBI data is saved in a clean folder when exporting to Power BI. You must be logged in to post a comment. First, you click Select Project File to choose your project folder. After choosing a folder, ScanWriter will close the Select Project File window and take you back to the home screen. You will now be able to click on Reader Management to select a reader. To view your project folder structure (after selecting the project), click File in the top left of the home screen, then click Show Project Folder and it will open for you. You must be logged in to post a comment. Yes, when you add a new project file to ScanWriter, an automatic folder structure will be created. This will include 1) Findings, 2) Project Overview, and 3) Source Documents. We recommend you use the structure to organize your documents. You must be logged in to post a comment. You should send in as many sample statements as you can for a reader request. 3-4 months of statements is usually a good minimum. If your bank statement changes formats in the middle, be sure to request all formats. If you need to redact the files first, please redact with a white background, and avoid black boxes all over the page. You must be logged in to post a comment. No, there is no cost or limit for regular reader requests including files like bank statements and credit card statements. You can request a custom reader for a specific or special type of file. Your purchase of ScanWriter includes 10 complimentary custom readers per license. You may purchase additional custom readers after the initial 10 are used. If you are unsure if your document requires a regular or custom reader, please contact ScanWriter Support at help@personable.com. You must be logged in to post a comment. If you are reading a bank statement, it is always a good idea to try auto select first. Click Bank or Credit Card Statements and choose the bank name. If ScanWriter can find the appropriate reader automatically, there will be no need to use library. You must be logged in to post a comment. (1) Auto-Select: After clicking Reader Management, try to use Auto-Select first. Choose the “Bank or Credit Card Statement” option, and select your Bank/Credit Union Name. Then click Data Import and choose the statement. ScanWriter will try to find the correct reader automatically even if it is an older version. (2) Public Library: If you receive this message, then try to find the reader in the Public Library. Some readers’ names change when the format changes. For example: on a BOA statement, the older template is called “Business Advantage Checking” but the newer template is called “Your Business Advantage Checking”. Look on your document to verify the exact account name. Sometimes, the format will update but the bank keeps the exact same account name. If we have more than one format available, you will see something like this: The “Before 2012” indicates an older template, while “Regular” would be the most updated one. (3) Request a new reader: If you cannot find the appropriate reader using the above two options, click Request Updated Reader button. Add the files you wish to create a template for. In 24-48 hours your new reader will be available to you, and you will receive an email notification. You must be logged in to post a comment. You can always click Request Updated Reader if you cannot find the appropriate reader. Upload the documents you want to process, then request the reader. You will be notified via email when the reader is completed and ready for download. You must be logged in to post a comment. No. There is no limitation on requesting normal readers. However, it is always a good idea to communicate with us to get a timeline for your project if you have a large request. Additionally, each ScanWriter license comes with 10 custom reader requests. You can purchase additional custom readers after the initial 10 are used. You must be logged in to post a comment. No, it is not required. ScanWriter will automatically skip pages with no transactions. You must be logged in to post a comment. Typically, statements load at 5-10 seconds per page. It will depend on how many transactions and images are in the file. Your computer’s CPU and memory will also affect the reading time. You must be logged in to post a comment. Please click “Read Data” in the Data Import screen to let ScanWriter begin processing. You must be logged in to post a comment. Yes, ScanWriter can read both typed and handwritten checks, and can extract information like Payee and Check Memo. You must be logged in to post a comment. Yes. Please select the appropriate reader in the Library by looking under the Combined Accounts section for the bank. You must be logged in to post a comment. Yes. We can read TIFF files. You can read a single TIFF file or put them in a folder and use folder read. You must be logged in to post a comment. Load Image should be checked only when you will use either Reread Data or Read Image after restoring. If these two features will not be used, Load Image can be unchecked and the restoring speed will be improved. You must be logged in to post a comment. No, if the check images come with the statement, you can process them together. If the reader was not able to automatically link the checks and statement, you can use the features under the Checks menu in Data Preview to capture the check images. You must be logged in to post a comment. The method will depend on the number of files you would like to process. Either a) the multiple years are saved in an individual PDF file or b) multiple files in a folder. A) If you are reading one PDF with multiple years, right click the PDF in Case Manager, go to Files Read > Read into Data Preview. B) If you are reading multiple PDFs with separate years, use SHIFT + Click to select all files at once, then right click > go to Files Read > Read into Data Preview. This will read all PDFs into one Data Preview window. Note: If you are selecting multiple PDFs at once to Read into Data Preview, make sure they all require the same reader. You must be logged in to post a comment. ScanWriter itself does not have any file size limitations. It depends on your computer’s CPU and memory. We typically recommend processing no more than 500 pages or 10,000 rows of data at once. You must be logged in to post a comment. Yes! There are two options in ScanWriter you can choose from to read multiple files at once. It will depend on the type of files you are processing. Method 1: Read into Data Preview Method 2: Read & Organize You must be logged in to post a comment. No, there is no limit for the number of pages, but it will depend on your computer’s CPU and memory. We recommend you start out processing smaller files, then gradually increase the file size to test how much your computer can handle. Ex: Start with a 3-6 month sample of your bank statement, and if it reads quickly, increase to a year’s worth of statements or more. You must be logged in to post a comment. Use Enter Data from Check Image You must be logged in to post a comment. Yes, ScanWriter can read both typed and handwritten check images, and can extract information like Payee, Payer, and Memo. If you have any special cases, please contact the ScanWriter team. You must be logged in to post a comment. Yes, the Account Number column will indicate the different account numbers. Check Balance will recognize that your file contains multiple accounts. You must be logged in to post a comment. After checking balance, Balance Difference column should show 0.00 if it is correct. If it does not show 0.00, you should look at the rows between the last 0.00 and the incorrect balance difference. For example, there is a Balance Difference 100.00. You should look at the interval above it. Make sure to check the columns such as Date, Amount, Beginning Balance and Ending Balance. Then change the incorrect data and click Redo Check Balance. You must be logged in to post a comment. If you have corrected or updated any data when running Check Balance, and you want to refresh after editing, click Redo Check Balance at the top. The data will be refreshed. You must be logged in to post a comment. Once you turn on Compare Data, it will display the captured data from the Data Preview screen in a green box on the source document. If you want to exit this feature, click Verify Data and Compare Data (Turn Off). The green box will not show on the PDF any more. You must be logged in to post a comment. It depends on the statement. Most bank statements include daily ending balances. If that is the case, ScanWriter will pick them up in the Balance column, and use those amounts for the Check Balance. If there are no daily ending balances on your statement, then ScanWriter will only use the beginning and ending balances for the month. You must be logged in to post a comment. There are several ways to check accuracy for a bank statement in ScanWriter. You can use “Totals”, “Check Balance” and “Compare Data”. Check Balance (Verify Data > Compare Balance > Check Balance (All Pages): Will compare the balance ScanWriter calculates against the balance on the statement. The Balance Difference column should show blue 0.00 if it is correct. Compare Data (Verify Data > Compare Data (Turn On)): Will display the captured data in a green box on top of the source document. You can easily make changes to any incorrect data in the green boxes, and it will automatically apply those changes to the Data Preview side. You must be logged in to post a comment. If you have corrected or updated any data when checking balance and want to recheck after editing, click Redo Check Balance. You must be logged in to post a comment. Please see the form below. You must be logged in to post a comment. No, the Transfer From/To columns will not affect the check balance results. Check Balance compares the balance ScanWriter calculated in the “Verify Balance” column against the “Balance” on the statement. The Transfer From/To columns would not affect the results. You must be logged in to post a comment. You can manually fill in check images using Select Image. You can choose to insert images into the Check Image, Check Memo Image, Signature Image, and Payee Image columns. The image will appear in whichever cell you select. You will select an image for each column separately. You must be logged in to post a comment. Right click on the word “Image” and select “Delete Image” from the menu. You must be logged in to post a comment. Yes, any manually edited data in ScanWriter, including images, show up in blue. You must be logged in to post a comment. Yes, if you turn on Sort & Highlight Duplicates, then you will see any accidentally duplicated transactions. You can figure out which month/which pages are repeated and delete the rows for those pages. You must be logged in to post a comment. Yes. Usually, after reading a bank statement, you can find the Business Name column already filled out next to the Description column. If you do not see the Business Name column, you can go to Edit Data > Mapping > “Get Business Name from Description” to create a Business Name column. You must be logged in to post a comment. Yes, it is ideal for the Date column to be standardized. You can use Date Change to make the dates a consistent format (Ex: MM/DD/YYYY). If your statement contains multiple years, be careful. You will have to use SHIFT + Click to perform Date Change with one year’s data selected at a time. You must be logged in to post a comment. Please check the Advanced setup for Check Balance or contact the ScanWriter Support Team for help. You must be logged in to post a comment. If you want to locate a specific check image on the source document, click on the Check Image, Payee, Payee Image or other columns related to the check image on that row. The corresponding area will be highlighted in Data Preview, and the page number will be shown. Note: If none of the image columns in Data Preview are filled out, you will have to locate the check image manually by browsing through the source document. You must be logged in to post a comment. When the Payee Image is missing, click Edit Data and Select Image (Turn On). Click on the cell you wish the image to be placed. Navigate to the image. Left click and hold, then drag the red box over the area you wish ScanWriter to read. Choose the rotation and the size. Click OK. The image will be linked to the cell you selected. The word ‘Image’ is visible. Click on the cell to view the copied image. Note: If the cell previously had a text value, it will be removed and replaced with the image. To confirm the changes to the selected cell, click Edit Data and Select Image (Turn Off). You must be logged in to post a comment. If the bank statement reader was unable to pick up the check images in the statement, you can use the Checks menu to add them yourself. You must be logged in to post a comment. Left click on the first cell and hold down SHIFT key and click the last cell in selection, these cells will be selected. You must be logged in to post a comment. There is no undo button for Delete Image, but you can use the Select Image feature to get the image again. Go to Edit Data > Select Image > Single Cell. Drag a box around the image on the PDF you wish to capture. You must be logged in to post a comment. When you use Enter Data from Image, you have two options to insert the payee names. You can manually type in the name in the Payee column, or you can use the “Read” feature. First, select which images you want to read. Then, click “Read” at the top of the window. Choose if you want to read only the selected cells or an entire column. The handwriting will be captured and put into the “Handwriting from Image” column Finally, click “Copy Result to Payee” to insert the data in the Payee column. You can choose to overwrite the existing data in the Payee column, or to copy information to the blank Payee cells only. You must be logged in to post a comment. In General Entity Normalization, if you click “Save” it will save it as a File Rule. If you click “Save and Share” it will save it as a Shared Rule. You must be logged in to post a comment. Yes, in General Entity Normalization, shared rules will run for the entire case. If you wish to run the rules for another case in ScanWriter, open the General Entity Normalization window, and click “Export Rules”. Choose a place to save the rule list. Then, in your new ScanWriter case, re-open the General Entity Normalization window. Click “Import Rules”, and choose the rule list to import. Choose if you want to merge the imported rules with any existing ones or replace them. The Rule List will appear in your new case. You must be logged in to post a comment. If you make a mistake during General Entity Normalization and accidentally change a business name you did not want to change, there are several steps to get the original name back. You must be logged in to post a comment. ScanWriter’s check image features can be used for both images included in the bank statement and check images in a separate PDF. You must be logged in to post a comment. When you reopen Entity Normalization, the right side should show blank. If you click on a Normalized Entity on the left side, the rule will be shown. Click Edit to modify the rule. You must be logged in to post a comment. Yes. Click Verify Data and Check Color Data. This feature can bring any text colored to the top of the Data Preview window so it is easy to make changes to them. You must be logged in to post a comment. If there are extra characters, select the rows and click Edit Data->Edit. Choose the column name and click Selected Replace. Type in the characters. In this example, type in “_” first and leave the “Replace to” blank. Click Apply. “_” is now removed. Continue to remove ‘…’ by repeating the above processes. Date column is clean now. You must be logged in to post a comment. If you cannot see this column, it is probably hidden. You must be logged in to post a comment. Yes, it will bring any colored text (yellow, red) to the top without modifying any data. You must be logged in to post a comment. Click Edit Data and Mapping, and choose Get Business Name from Payee. Payee will be copied to the Business Name column. You must be logged in to post a comment. No, integrating checks will not affect the Check Balance as long as all images were copied up correctly. You must be logged in to post a comment. You must be logged in to post a comment. Yes. Once you update Payee names in Enter Data from Image, they should be automatically updated/copied to the Business Name column. You must be logged in to post a comment. You will know if all deposit rows were integrated if there are no yellow highlighted rows at the bottom of the data. You must be logged in to post a comment. You can perform both Check Image Integration for outgoing checks and Deposit Slip Integration for incoming checks/images. The order does not matter. First, make sure to pay attention to the following columns for each file: For Check Image Integration, pay attention to the required columns: Account Number, Check Number, and Check Amount/Debit Amount. Make sure the fields are correct before integrating. For Deposit Slip Integration, the required columns are Account Number, Deposit Date (on deposit file)/Date (on bank statement), Deposit Amount (on deposit file)/Credit Amount (on bank statement), and Item Count on each deposit slip row. You must be logged in to post a comment. The order does not matter, but it is recommended to restore the bank statement first. You must be logged in to post a comment. It depends on two circumstances: Select the row and click Edit Data and Date Change. Select the Date Format. Leave the Year blank. Dates are changed into the selected format no matter how many years the statement spans. You must be logged in to post a comment. The Date Swap feature can help to swap the date from MM/DD to DD/MM. Go to Edit Data > Date Swap. The month and date sections will be switched. You must be logged in to post a comment. You must be logged in to post a comment. Right click on the PDF file in Case Manager, and click Modify PDF > Redact. You must be logged in to post a comment. You must be logged in to post a comment. You must be logged in to post a comment. Some images may not capture with the bank statement due to the quality of the document, so you will have to add them. You can use the features under the Checks menu to capture check images and integrate them with a bank statement. You must be logged in to post a comment. Once you click Save in Data Preview, it will overwrite the data from the previous SWAX file. At this point, there will be no way to bring back the old data file. To avoid this, you can use Save As to create multiple versions of a SWAX file. You must be logged in to post a comment. If you have restored the wrong .swa file, click Save and Restore. Choose the Restore option. Browse for the correct restore file and click Open. Then choose Replace. The wrong swa file will be replaced. You must be logged in to post a comment. You must be logged in to post a comment. Yes. After clicking Export to Excel, uncheck the option “Export source document information for SourceLink”. Now, SouceLink will not be available in this Excel at all. You must be logged in to post a comment. Yes, you can remove the red triangles in the cells without removing SourceLink. Open Excel, Click File-> Options -> Advanced -> Display -> Select “No comments or indicators”. The linkage will still be there, but the red dots will be turned off. You must be logged in to post a comment. 1. Yes. Right click the Excel file in ScanWriter Case Manager, and click “Export”. You must be logged in to post a comment. Yes. There are two ways to combine separate files into one Excel. Method 1: You can restore all .swax files together in ScanWriter and export them at once into Excel. Method 2: You can export the first .swax file to a new Excel, then export the remaining data files to the existing Excel. You must be logged in to post a comment. Yes! Click Investigation Models and choose Excel Export. There are three options to choose the columns to export: You must be logged in to post a comment. No. ScanWriter’s pre-created Power BI models use specific columns from ScanWriter. Custom or manually-created columns will not populate in those Power BI models. If you have any special requests regarding Power BI visualizations, please contact the ScanWriter team to request a customized model. You must be logged in to post a comment. Yes. You can save all PBI Excels into one folder to combine all the data into one analytical model. Choose Export PBI Data for all exports (except the last file) and save them into the same folder. When exporting the last file, choose Export and Run PBI, and it will run all the PBI Excel files in the folder. You must be logged in to post a comment. After clicking Export and Run PBI, ScanWriter will create an Excel sheet in the folder you select and export the data into PBI. So if the folder is not clean, PBI will show an error message when clicking Refresh. The data from ScanWriter will not be updated to the report. You must be logged in to post a comment. After getting the PBI report from ScanWriter, you can save a copy (Save As) and pass it to your teammates for analyzing data outside of ScanWriter. As long as they have the Power BI software installed on another computer, they will be able to see the report you pass them. You must be logged in to post a comment. Yes. You can use the “Business Name Normalization” feature in ScanWriter to normalize business names. So when exporting, they will be merged in Power BI. Ex: Walmart 1, Walmart 2, and Walmart 3 can be consolidated to “Walmart” so it shows up as one entity in Power BI. You must be logged in to post a comment. Microsoft Power BI is a data visualization tool. Through ScanWriter, you can access pre-created Power BI models created to visualize different types of data. Currently, there are four types of ScanWriter Power BI models: General Models, Models for Bank and Credit Card Statements, Models for Financial Statements, and Models for Special Reports. Models for Bank and Credit Card Statements are the most popular; some models include Flow of Funds and SAR Analysis. Here is a full list of our Power BI reports and their descriptions: You must be logged in to post a comment. Yes. SourceLink should be installed along with ScanWriter. It allows you to view the data from any source document you processed with ScanWriter once the document has been exported to Excel. Click Yes, then Install, and then close the window once it is complete. You must be logged in to post a comment. Yes, as long as you set up your printer. For scanning paper documents, we recommend the following settings: 1) At least 300 DPI for document quality. 2) Scanner should be set to grayscale. 3) Turn off any auto-functions/auto-sizing on the scanner. Note: If you already have a digital PDF file, DO NOT print it and scan. You must be logged in to post a comment. You must be logged in to post a comment.
Login (1)
AI (16)
Leave a Reply
Leave a Reply
Leave a Reply
Leave a Reply
Leave a Reply
The natural language processing interface in ScanWriter AI allows users to easily interact with their data by asking questions and receiving summaries, reports, and visualizations in response, making financial analysis more efficient and effective.Leave a Reply
Leave a Reply
Leave a Reply
Leave a Reply
Leave a Reply
Leave a Reply
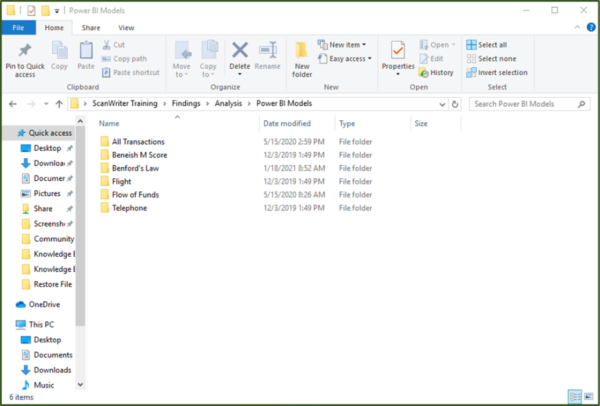
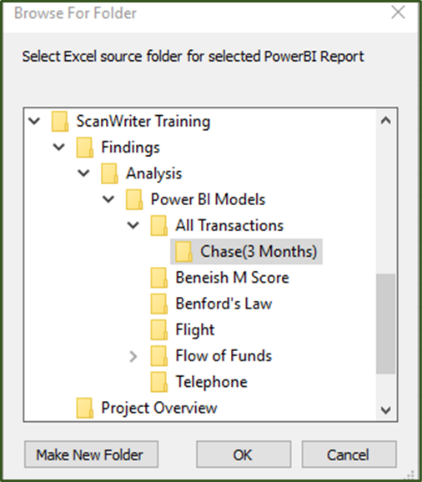
Leave a Reply
Project File (4)
Leave a Reply


Leave a Reply

Leave a Reply
Leave a Reply
Reader (20)
Leave a Reply
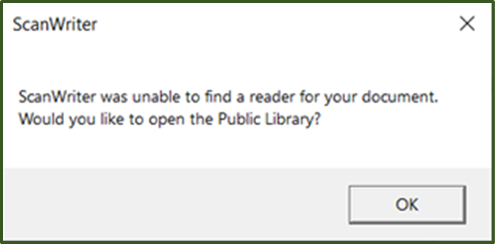
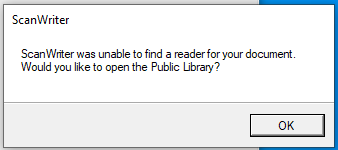
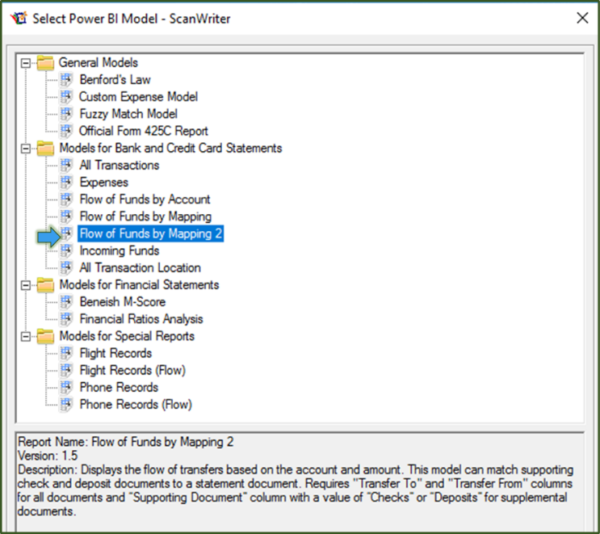
Leave a Reply
Leave a Reply


Leave a Reply
Leave a Reply
Leave a Reply
Reading Data (14)
Leave a Reply
Leave a Reply
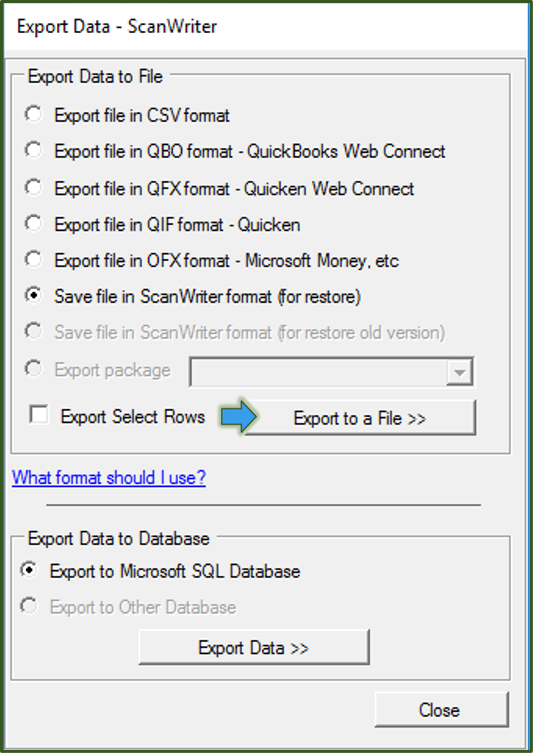
Leave a Reply
Leave a Reply
Leave a Reply
Leave a Reply
Leave a Reply
Leave a Reply
Leave a Reply
Leave a Reply
1) Select all the files you wish to process, right click > Files Read > Read into Data Preview.
2) This method will read all files into one Data Preview screen using ONE reader.
3) This method should only be used if all files selected require the SAME READER (same bank, account type, page layout). Example: you have 12 PDFs all from the same account, and you want to read the data at once.
1) Select all the files you wish to process, right click > Files Read > Read and Organize.
2) This method will read all the files separately and save one .swax file for each PDF.
3) This method can work even if each PDF requires a different reader, since ScanWriter will look for a reader for each PDF separately.
4) This method will not open the Data Preview window at the end, so make sure to restore each .swax file to review the data.
5) A Read & Organize summary will generate at the end. It will tell you if any files were unable to read.
6) After reading, the files will be organized into sub-folders according to the bank. (Ex: All BOA files will be in a Bank of America folder, and all Wells Fargo files would be in another folder).Leave a Reply
Leave a Reply
1. Click Check and choose Enter Data from Check Image.
2. Use the drop-down menus to select the Image Column, Text Data Column and other optional columns. Click OK.
3. It shows the Image Column selected, and the Text Data column that ScanWriter picked up.
4. If you see an incorrect Payee, click into the cell and start typing.
5. It will show you if there are any suggested names to auto-fill the cell.
6. Once the Payee is correct, click Enter on your keyboard to move to the next row.
7. Once all Payees are correct, click Close to close the window. All the changes will save automatically.
8. The Payees will be correct in Data Preview.Leave a Reply
Leave a Reply
Verify Accuracy (9)
Leave a Reply


Leave a Reply
Leave a Reply


Leave a Reply
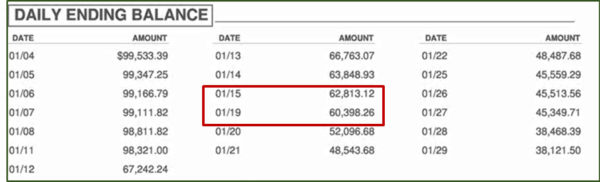
Will ScanWriter give you balances by day, or only the beginning and ending balances for the month?
Leave a Reply
Total (Verify Data > Totals): Shows the total number of Deposits and Debits and the Sum of Credit Amounts and Sum of Debit Amounts.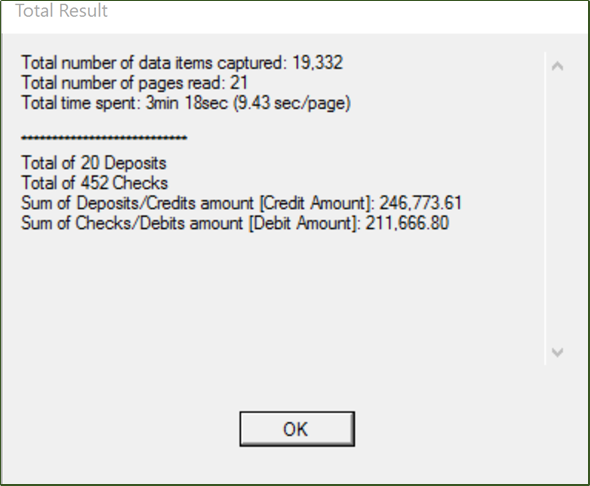


Leave a Reply
Leave a Reply

Leave a Reply
Leave a Reply
Editing Data (36)
Leave a Reply
Leave a Reply
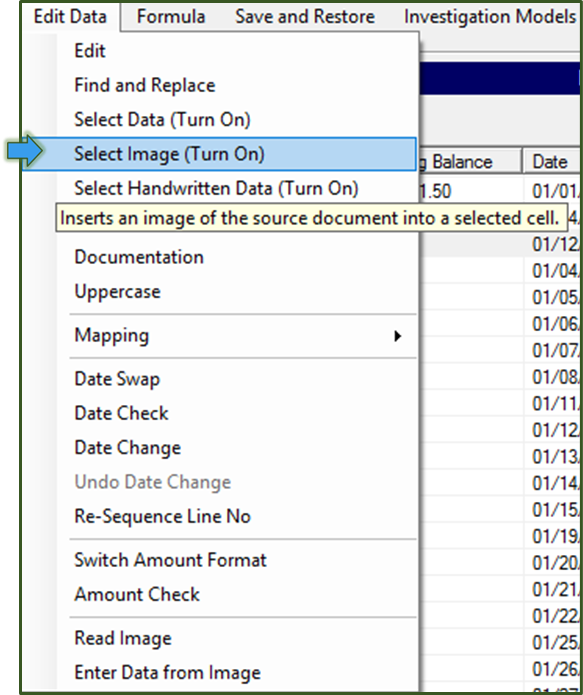
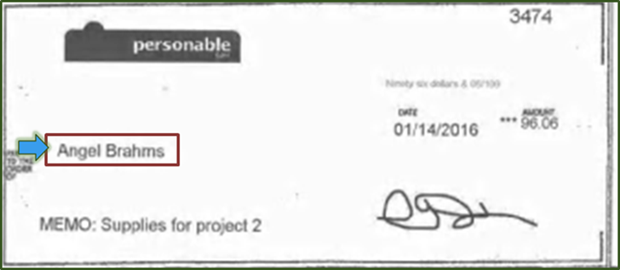
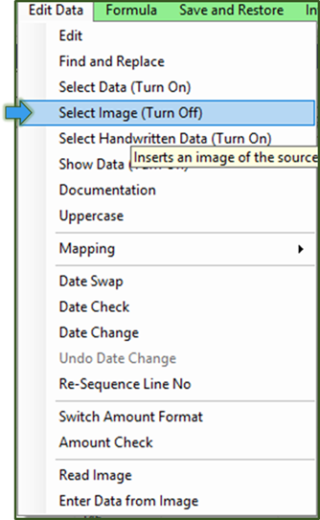
Leave a Reply
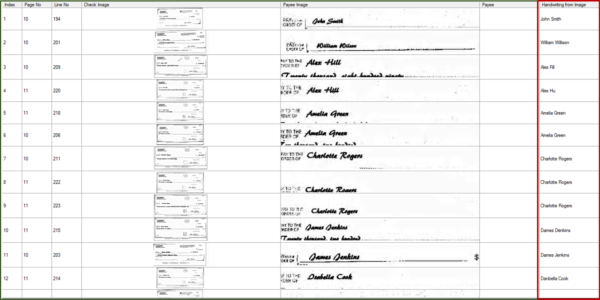
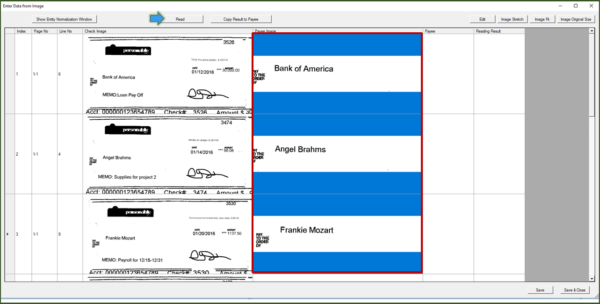
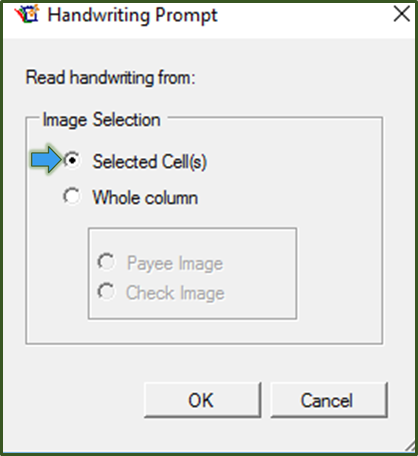
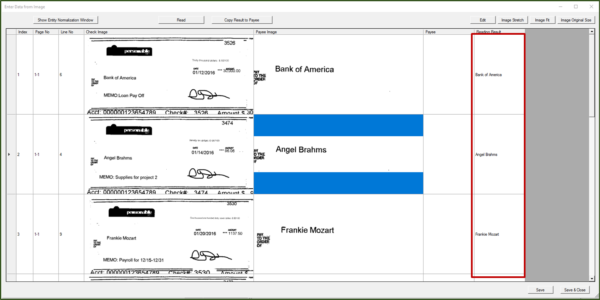
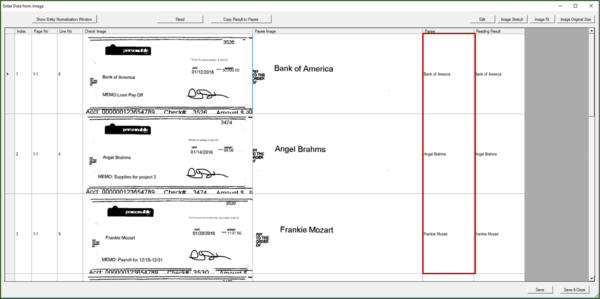
Leave a Reply
Leave a Reply
Leave a Reply
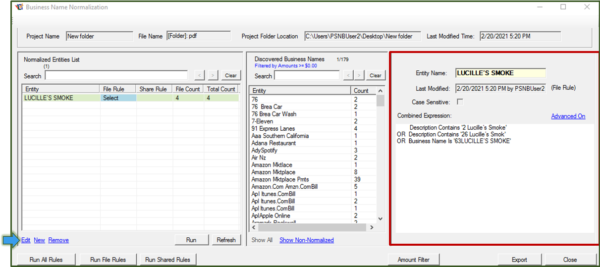
Leave a Reply
Leave a Reply


Leave a Reply
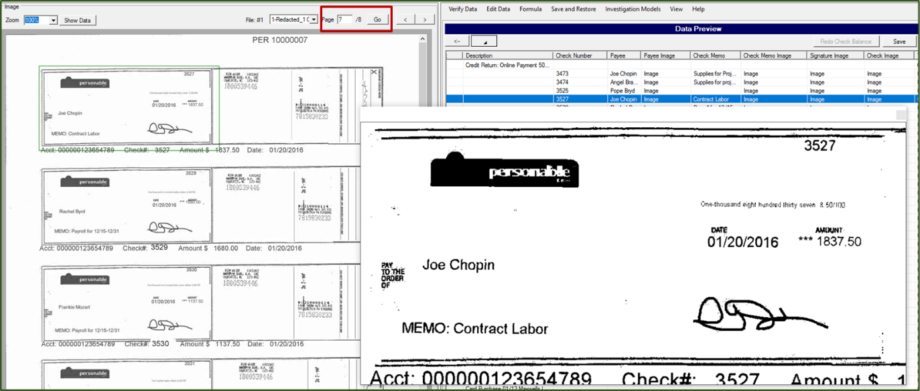
To create a check image template, go to Checks > Select Check Images (Turn On).Leave a Reply
Leave a Reply
Leave a Reply


Leave a Reply
File Rules are usable for the current file open in ScanWriter. A Shared Rule will apply the rule across all files in the case.Leave a Reply
Leave a Reply
Leave a Reply
Leave a Reply

Leave a Reply
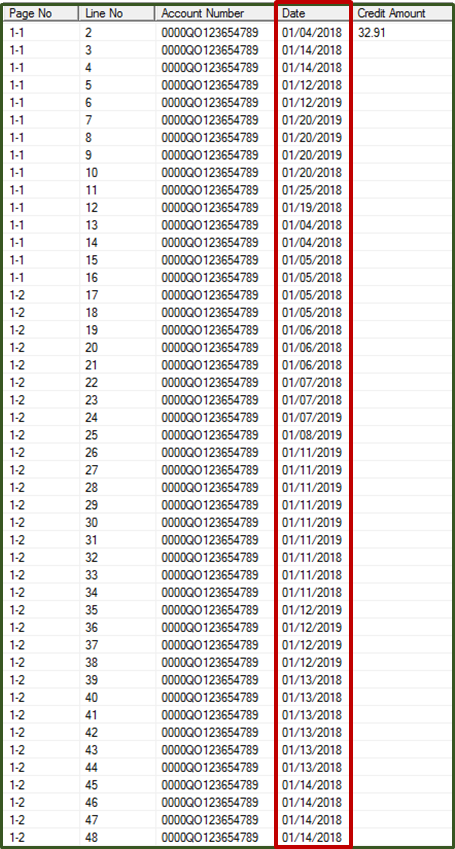
Leave a Reply


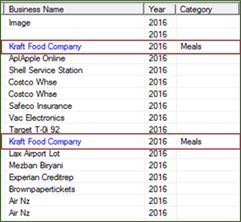
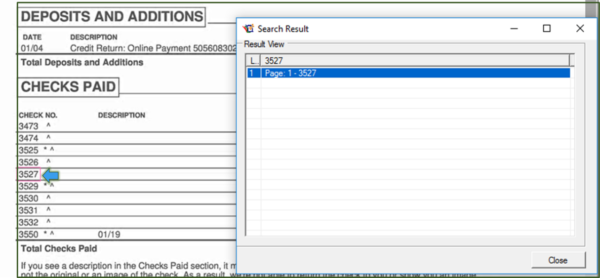
Leave a Reply
Leave a Reply
Leave a Reply


Leave a Reply
Leave a Reply


Leave a Reply
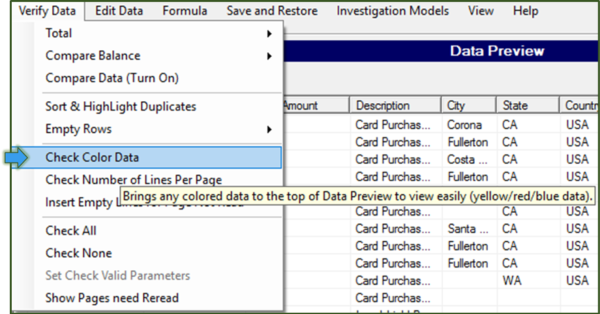
Leave a Reply
Leave a Reply
Leave a Reply
Leave a Reply

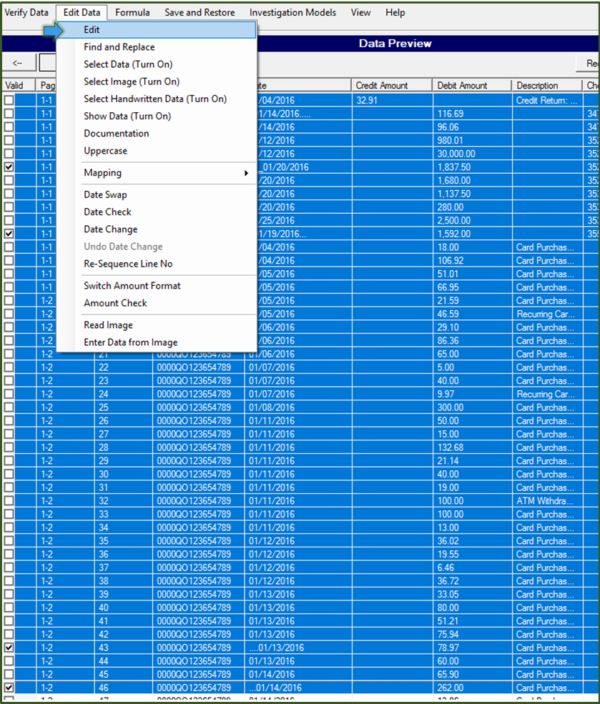
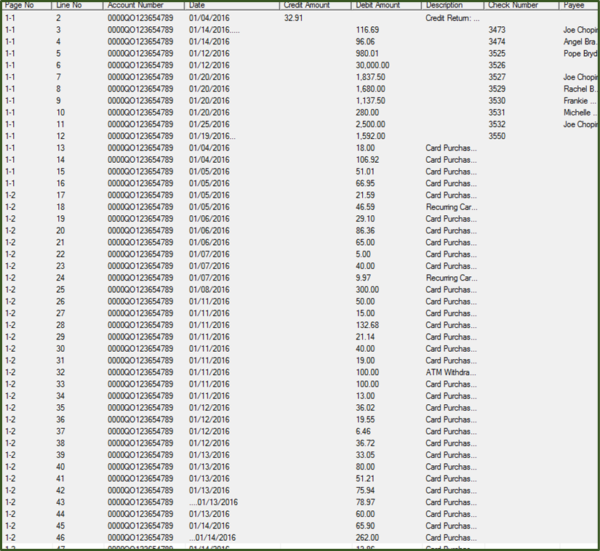
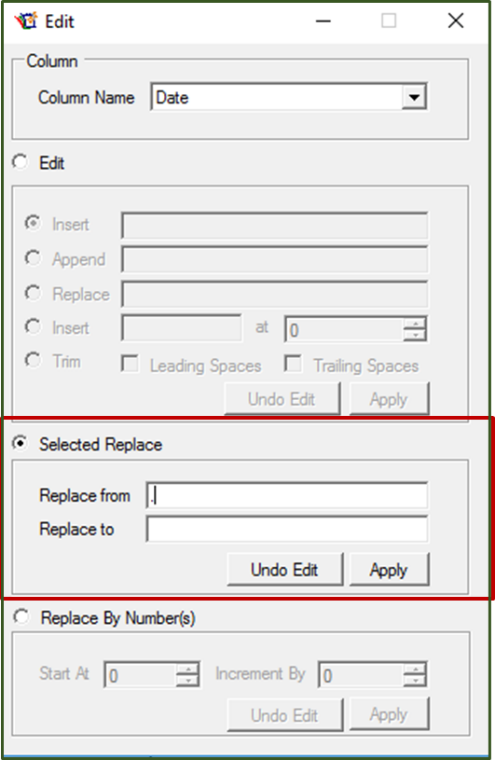
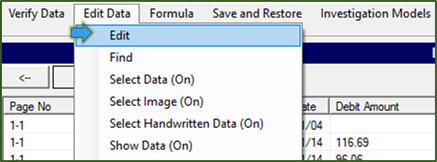
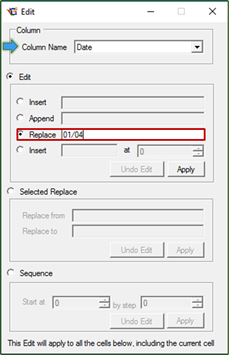
Leave a Reply
Leave a Reply

Leave a Reply
You can choose either Map Redaction or Text Redaction:
Map Redaction – drag the area for redaction.
Text Redaction – search and replace wording.Leave a Reply


Leave a Reply


Leave a Reply
Leave a Reply
Saving and Restoring (3)
Leave a Reply
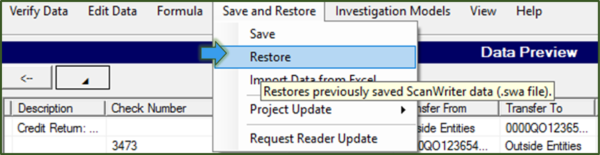
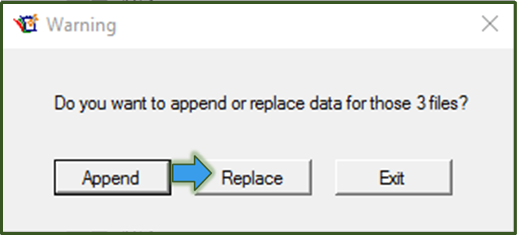
Leave a Reply

Leave a Reply
Export into Excel (5)
Leave a Reply

Leave a Reply
2. Select “Export with Linked Document” to export the PDF in the same folder as the Excel.
3. Send your colleague the folder containing 1) the source document PDF and 2) the Excel spreadsheet.
4. If your colleague has the SourceLink for Excel add-in installed on their computer, they can see the exact data on the source document, otherwise they can only see the PDF page that the data comes from.Leave a Reply
Leave a Reply

Leave a Reply
Power BI (13)
Leave a Reply
Leave a Reply
Leave a Reply
Leave a Reply
Leave a Reply
Leave a Reply
Others (11)
Leave a Reply
Leave a Reply
Leave a Reply
FAQ
Category:
Login
Category:
AI
Category:
AI
Category:
AI
Category:
AI
Category:
AI
Category:
AI
Category:
AI
Category:
AI
Category:
AI
Category:
AI
Category:
AI
Category:
AI
Category:
Project File
Category:
Project File
Category:
Project File
Category:
Project File
Category:
Reader
Category:
Reader
Category:
Reader
Category:
Reader

Category:
Reader
Category:
Reader
Category:
Reading Data
Category:
Reading Data
Category:
Reading Data
Category:
Reading Data
Category:
Reading Data
Category:
Reading Data
Category:
Reading Data
Category:
Reading Data
Category:
Reading Data
Category:
Reading Data
Category:
Reading Data
Category:
Reading Data
Category:
Reading Data
Category:
Reading Data
Category:
Verify Accuracy
Category:
Verify Accuracy
Category:
Verify Accuracy
Category:
Verify Accuracy
a
Category:
Verify Accuracy
Category:
Verify Accuracy
Category:
Verify Accuracy
Category:
Verify Accuracy
Category:
Verify Accuracy
Category:
Editing Data
Category:
Editing Data
Category:
Editing Data
Category:
Editing Data
Category:
Editing Data
Category:
Editing Data
Category:
Editing Data
Category:
Editing Data
Category:
Editing Data
Category:
Editing Data
Category:
Editing Data
Category:
Editing Data
Category:
Editing Data
Category:
Editing Data
Category:
Editing Data
Category:
Editing Data
Category:
Editing Data
Category:
Editing Data
Category:
Editing Data
Category:
Editing Data
Category:
Editing Data
Category:
Editing Data
Category:
Editing Data
Category:
Editing Data
Category:
Editing Data
Category:
Editing Data
Category:
Editing Data
Category:
Editing Data
Category:
Editing Data
Category:
Editing Data
Category:
Editing Data
Category:
Editing Data
Category:
Editing Data
Category:
Editing Data
Category:
Editing Data
Category:
Editing Data
Category:
Saving and Restoring
Category:
Saving and Restoring
Category:
Saving and Restoring
Category:
Export into Excel
Category:
Export into Excel
Category:
Export into Excel
Category:
Export into Excel
Category:
Export into Excel
Category:
Power BI

Category:
Power BI
Category:
Power BI
Category:
Power BI
Category:
Power BI
Category:
Power BI
Category:
Others
Category:
Others
Category:
Others
Leave a Reply
You must be logged in to post a comment.