
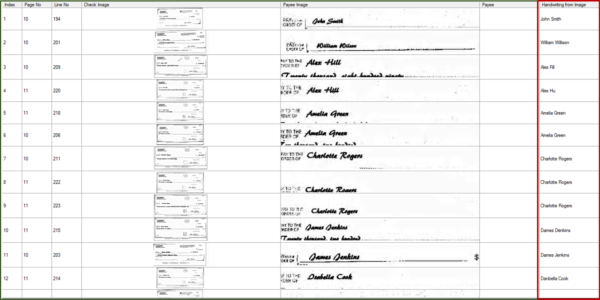
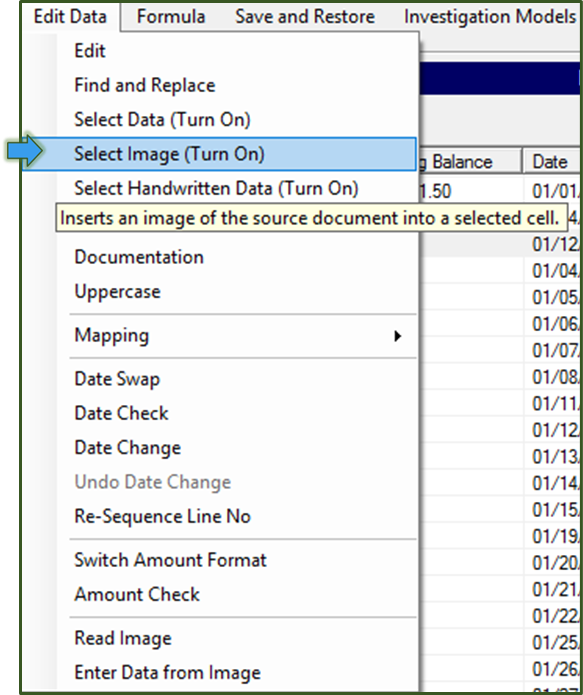
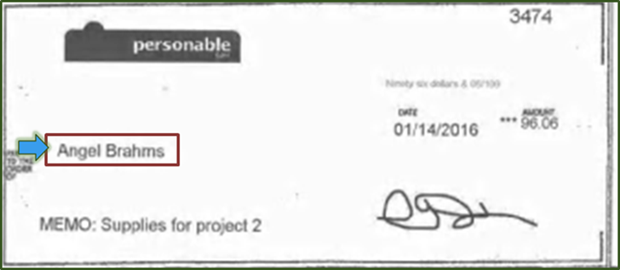
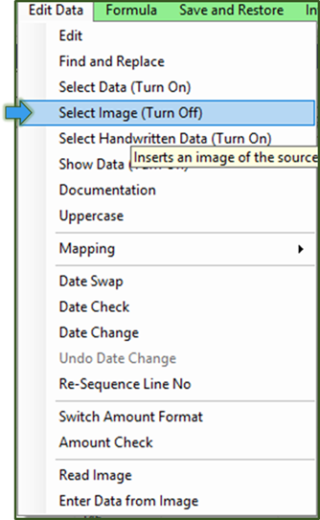
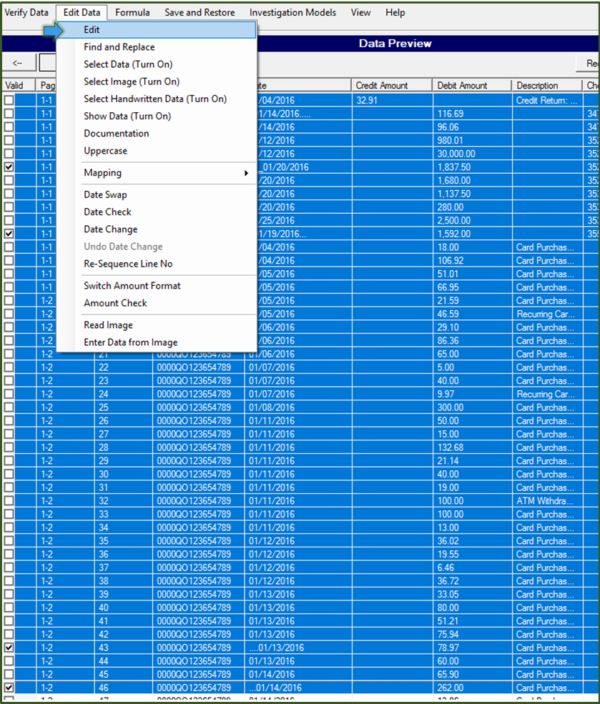
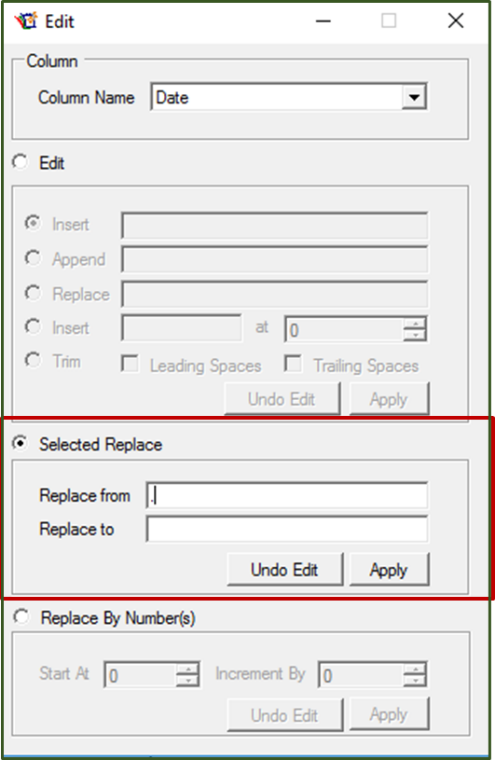
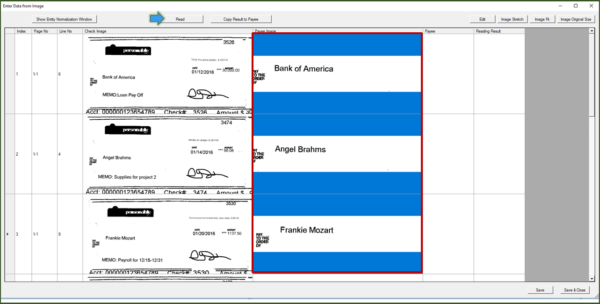
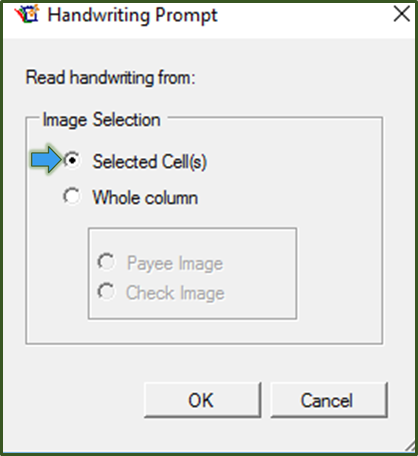
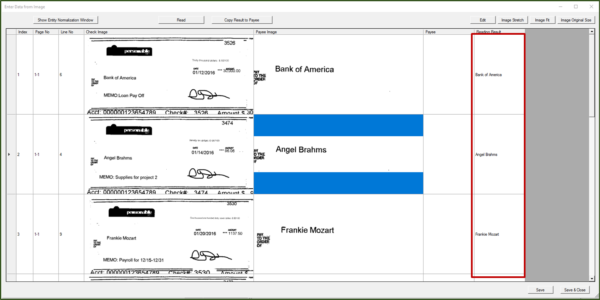
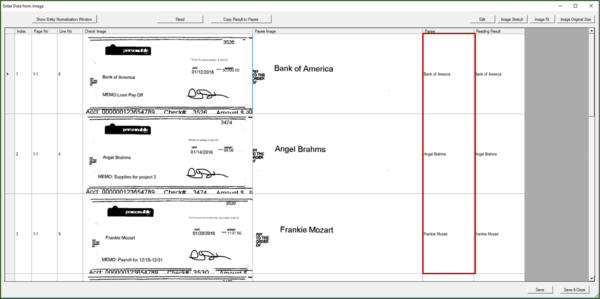
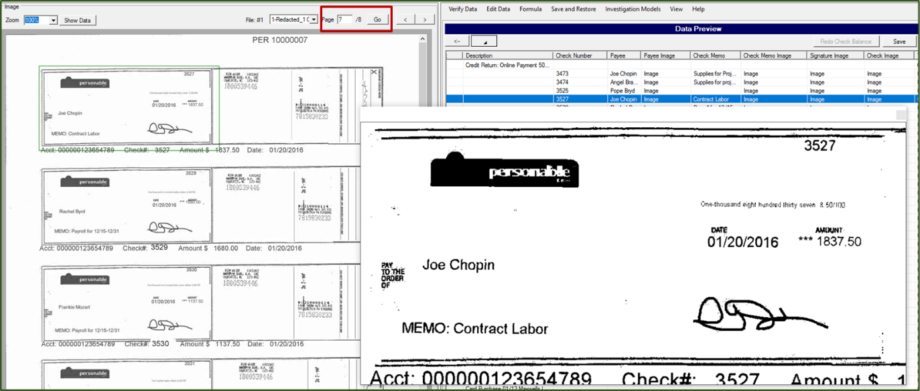
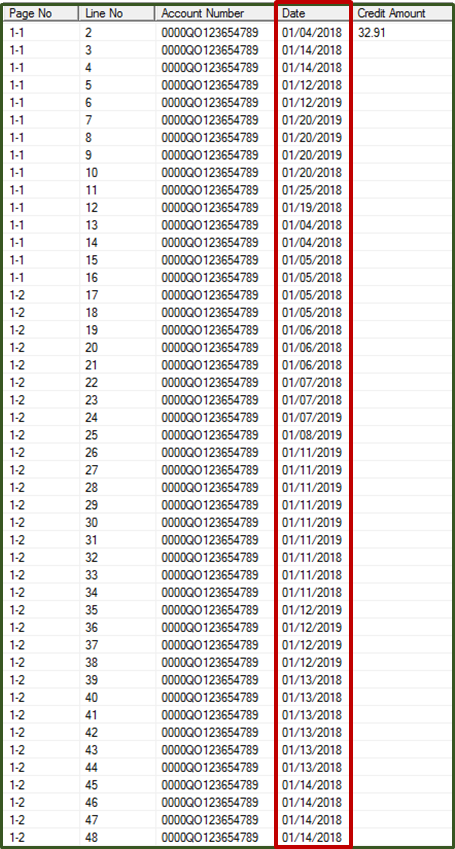
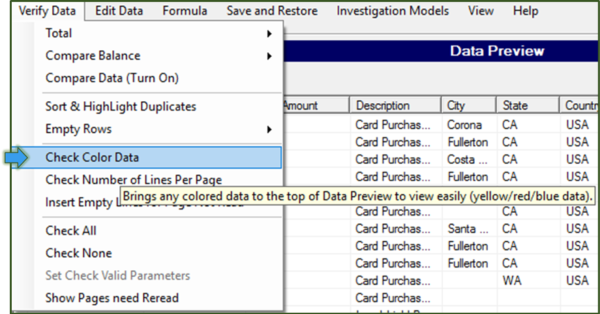
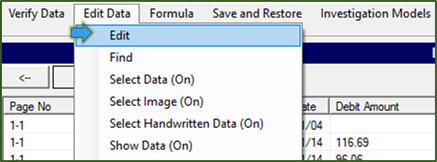
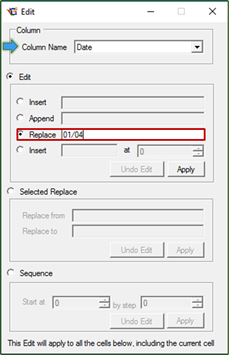
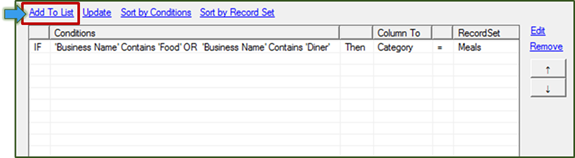
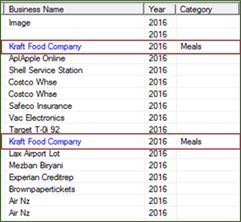
When you reopen Entity Normalization, the right side should show blank. If you click on a Normalized Entity on the left side, the rule will be shown. Click Edit to modify the rule. If the bank statement reader was unable to pick up the check images in the statement, you can use the Checks menu to add them yourself. You must be logged in to post a comment. Left click on the first cell and hold down SHIFT key and click the last cell in selection, these cells will be selected. You must be logged in to post a comment. There is no undo button for Delete Image, but you can use the Select Image feature to get the image again. Go to Edit Data > Select Image > Single Cell. Drag a box around the image on the PDF you wish to capture. You must be logged in to post a comment. When you use Enter Data from Image, you have two options to insert the payee names. You can manually type in the name in the Payee column, or you can use the “Read” feature. First, select which images you want to read. Then, click “Read” at the top of the window. Choose if you want to read only the selected cells or an entire column. The handwriting will be captured and put into the “Handwriting from Image” column Finally, click “Copy Result to Payee” to insert the data in the Payee column. You can choose to overwrite the existing data in the Payee column, or to copy information to the blank Payee cells only. You must be logged in to post a comment. In General Entity Normalization, if you click “Save” it will save it as a File Rule. If you click “Save and Share” it will save it as a Shared Rule. You must be logged in to post a comment. Yes, in General Entity Normalization, shared rules will run for the entire case. If you wish to run the rules for another case in ScanWriter, open the General Entity Normalization window, and click “Export Rules”. Choose a place to save the rule list. Then, in your new ScanWriter case, re-open the General Entity Normalization window. Click “Import Rules”, and choose the rule list to import. Choose if you want to merge the imported rules with any existing ones or replace them. The Rule List will appear in your new case. You must be logged in to post a comment. If you make a mistake during General Entity Normalization and accidentally change a business name you did not want to change, there are several steps to get the original name back. You must be logged in to post a comment. ScanWriter’s check image features can be used for both images included in the bank statement and check images in a separate PDF. You must be logged in to post a comment. When the Payee Image is missing, click Edit Data and Select Image (Turn On). Click on the cell you wish the image to be placed. Navigate to the image. Left click and hold, then drag the red box over the area you wish ScanWriter to read. Choose the rotation and the size. Click OK. The image will be linked to the cell you selected. The word ‘Image’ is visible. Click on the cell to view the copied image. Note: If the cell previously had a text value, it will be removed and replaced with the image. To confirm the changes to the selected cell, click Edit Data and Select Image (Turn Off). You must be logged in to post a comment. Yes. Click Verify Data and Check Color Data. This feature can bring any text colored to the top of the Data Preview window so it is easy to make changes to them. You must be logged in to post a comment. If there are extra characters, select the rows and click Edit Data->Edit. Choose the column name and click Selected Replace. Type in the characters. In this example, type in “_” first and leave the “Replace to” blank. Click Apply. “_” is now removed. Continue to remove ‘…’ by repeating the above processes. Date column is clean now. You must be logged in to post a comment. If you cannot see this column, it is probably hidden. You must be logged in to post a comment. Yes, it will bring any colored text (yellow, red) to the top without modifying any data. You must be logged in to post a comment. Click Edit Data and Mapping, and choose Get Business Name from Payee. Payee will be copied to the Business Name column. You must be logged in to post a comment. No, integrating checks will not affect the Check Balance as long as all images were copied up correctly. You must be logged in to post a comment. You must be logged in to post a comment. Yes. Once you update Payee names in Enter Data from Image, they should be automatically updated/copied to the Business Name column. You must be logged in to post a comment. If you want to locate a specific check image on the source document, click on the Check Image, Payee, Payee Image or other columns related to the check image on that row. The corresponding area will be highlighted in Data Preview, and the page number will be shown. Note: If none of the image columns in Data Preview are filled out, you will have to locate the check image manually by browsing through the source document. You must be logged in to post a comment. Please check the Advanced setup for Check Balance or contact the ScanWriter Support Team for help. You must be logged in to post a comment. Yes, it is ideal for the Date column to be standardized. You can use Date Change to make the dates a consistent format (Ex: MM/DD/YYYY). If your statement contains multiple years, be careful. You will have to use SHIFT + Click to perform Date Change with one year’s data selected at a time. You must be logged in to post a comment. Yes. Usually, after reading a bank statement, you can find the Business Name column already filled out next to the Description column. If you do not see the Business Name column, you can go to Edit Data > Mapping > “Get Business Name from Description” to create a Business Name column. You must be logged in to post a comment. Yes, if you turn on Sort & Highlight Duplicates, then you will see any accidentally duplicated transactions. You can figure out which month/which pages are repeated and delete the rows for those pages. You must be logged in to post a comment. Yes, any manually edited data in ScanWriter, including images, show up in blue. You must be logged in to post a comment. Right click on the word “Image” and select “Delete Image” from the menu. You must be logged in to post a comment. You can manually fill in check images using Select Image. You can choose to insert images into the Check Image, Check Memo Image, Signature Image, and Payee Image columns. The image will appear in whichever cell you select. You will select an image for each column separately. You must be logged in to post a comment. You will know if all deposit rows were integrated if there are no yellow highlighted rows at the bottom of the data. You must be logged in to post a comment. You can perform both Check Image Integration for outgoing checks and Deposit Slip Integration for incoming checks/images. The order does not matter. First, make sure to pay attention to the following columns for each file: For Check Image Integration, pay attention to the required columns: Account Number, Check Number, and Check Amount/Debit Amount. Make sure the fields are correct before integrating. For Deposit Slip Integration, the required columns are Account Number, Deposit Date (on deposit file)/Date (on bank statement), Deposit Amount (on deposit file)/Credit Amount (on bank statement), and Item Count on each deposit slip row. You must be logged in to post a comment. The order does not matter, but it is recommended to restore the bank statement first. You must be logged in to post a comment. It depends on two circumstances: Select the row and click Edit Data and Date Change. Select the Date Format. Leave the Year blank. Dates are changed into the selected format no matter how many years the statement spans. You must be logged in to post a comment. The Date Swap feature can help to swap the date from MM/DD to DD/MM. Go to Edit Data > Date Swap. The month and date sections will be switched. You must be logged in to post a comment. You must be logged in to post a comment. Right click on the PDF file in Case Manager, and click Modify PDF > Redact. You must be logged in to post a comment. You must be logged in to post a comment. You must be logged in to post a comment. Some images may not capture with the bank statement due to the quality of the document, so you will have to add them. You can use the features under the Checks menu to capture check images and integrate them with a bank statement. You must be logged in to post a comment.
Editing Data (36)

To create a check image template, go to Checks > Select Check Images (Turn On).Leave a Reply
Leave a Reply
Leave a Reply


Leave a Reply
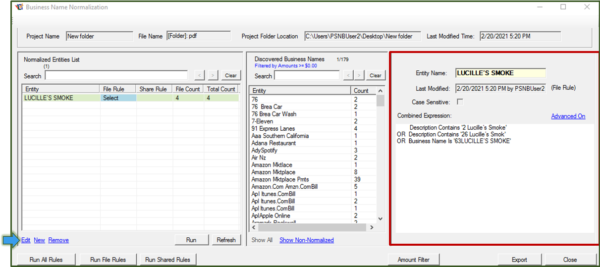
File Rules are usable for the current file open in ScanWriter. A Shared Rule will apply the rule across all files in the case.Leave a Reply
Leave a Reply
Leave a Reply
Leave a Reply


Leave a Reply
Leave a Reply


Leave a Reply
Leave a Reply
Leave a Reply


Leave a Reply
Leave a Reply


Leave a Reply
Leave a Reply
Leave a Reply
Leave a Reply
Leave a Reply
Leave a Reply
Leave a Reply
Leave a Reply
Leave a Reply
Leave a Reply
Leave a Reply
Leave a Reply
Leave a Reply

Leave a Reply
Leave a Reply

Leave a Reply
You can choose either Map Redaction or Text Redaction:
Map Redaction – drag the area for redaction.
Text Redaction – search and replace wording.Leave a Reply


Leave a Reply


Leave a Reply
Leave a Reply
FAQ
Category:
Editing Data
Category:
Editing Data
Category:
Editing Data
Category:
Editing Data
Category:
Editing Data
Category:
Editing Data
Category:
Editing Data
Category:
Editing Data
Category:
Editing Data
Category:
Editing Data
Category:
Editing Data
Category:
Editing Data
Category:
Editing Data
Category:
Editing Data
Category:
Editing Data
Category:
Editing Data
Category:
Editing Data
Category:
Editing Data
Category:
Editing Data
Category:
Editing Data
Category:
Editing Data
Category:
Editing Data
Category:
Editing Data
Category:
Editing Data
Category:
Editing Data
Category:
Editing Data
Category:
Editing Data
Category:
Editing Data
Category:
Editing Data
Category:
Editing Data
Category:
Editing Data
Category:
Editing Data
Category:
Editing Data
Category:
Editing Data
Category:
Editing Data
Category:
Editing Data
Leave a Reply
You must be logged in to post a comment.